
I just ordered a set of H&R Sports for my car. I've read a ton about doing the install on the fronts but I am going to ask again here. What is your method of removing the stock front springs?


I just ordered a set of H&R Sports for my car. I've read a ton about doing the install on the fronts but I am going to ask again here. What is your method of removing the stock front springs?
86 1D #9823
H&R Sport Springs, T-Coupe Intercooler, CAI, Bosch Bypass, 3" DP

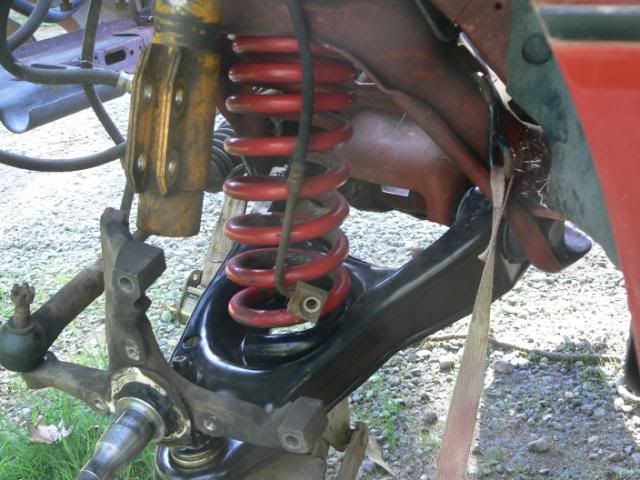
Put the car on jackstands. Remove the respective tires and wheels. Then take a jack and pump it up to snug on the LCA. Remove the strut to spindle bolts.
Now, this is where you must take responsiblity for your own safety. Springs have a great deal of stored energy, enough to kill you or knock you senseless. Some of us wished it had killed some of us, instead of knocking us senseless, but that's a whole "nother" story. Anyhow, make a decision as to what your pain threshold is and how likely you think the spring will jump out of its spring pocket and bonk you in a place you don't wish to be bonked. If you think its likely that you'll get bonked, either tie the spring with a proper appliance to either the LCA or the upper mounting pocket, or...go ahead and lower the jack carefully. When it is competely lowered, assuming its a stock spring, you may need to use a lever of some sort to coax the spring out of the LCA or upper spring pocket, or you can use my method and just kick it out (again, I will not assume any liability for you using such a dangerous and stupid method, I pay my insurance premiums, you need to reflect on how your carrier will respond to the wounds you may inflict on youself.)
When you have safely removed the spring (or taken a trip to local emergency room, they know me by name at mine) prep your new spring. You need to remove or replace the spring isolators both in the upper bucket and around the lower spring tail. Then clock the spring so that it properly orients itself in the LCA. Place it between the LCA and the bucket. At this point you may wonder "how the hell is that going to work." The angle of the spring to the LCA and bucket will look impossibly oblique, but soldier on. Start raising the jack, thereby lowering the spring. If the the car starts to rise off the jackstands, do not...I repeat DO NOT, ask your wife or significant other to sit on the front of the car in order to try to help compress the spring. It won't work and will cause you to have arguments with that person for the next 30 years..."you only had me sit on the car cause you think I'm fat" "No honey I was desperately trying to get the car finished and you were the most convenient weight.....uh oh). Instead, tie the jack to the k-member with a hold down, cinch it tight. Now as you compress the spring, (remember you could have decided to compress it with a tool, so this was your decision and I'm not going to take responsibility for your irresponsible action, tell your lawyer to look elsewhere) use a lever, or a foot to help nudge the spring into place.
Replace the spindle to strut bolts. Etc, Etc.
All kidding aside, be careful when uncompressing and compressing springs. They can cause major damage, and you should carefully consider using proper tools to minimize the potential for mayhem.
Last edited by Bob Holmes; 05-29-2012 at 07:43 PM. Reason: spelling
Enough of that, it was giving me a headache.

A couple notes to add to Bob's expertise.
1. The strut to spindle bolts/nuts go to 148 Ft-Lbs. which is REALLY tight if they've not been loosened since they left the factory. I had to use two 500 Ft-Lb impact wrenches (one on the bolt head the other on the associated nut) just to loosen mine.
2. Loosen the a-arm to k-member pivot bolts, Otherwise you'll be fighting the twisting of the rubber bushings against the spring and need to put significant weight on the ball joint end to get the new, hopefully shorter, springs in place. With the inner pivots loosened, the arm will free-fall (note its heavy and can do some damage all by itself).
3. Safety wire the top few coils of the spring against the top of the k-frame to keep it from suddenly flying out. And use a spring compressor. Most parts stores will rent them.
4. Get the car at ride height before tightening the inner a-arm bolts. Yep, 148 Ft-Lbs. You can use the jack under the ball joint to raise the car until it just starts to lift off the jack stand and then tighten the inner bolts/nuts. Be careful under there as that's a LOT of muscle to push on while the car is dangling in the air by the floor jack.
5. Have someone help you. Or at least be nearby watching so they can dial the phone, if needed. If Bob wasn't still recovering from playing Volvo Gladiator, he'd be glad to help.
Helping SVO owners & racers since 1984
Poll Finds 30% Of Americans Still Undecided Whether To Vote Out Of Fear Or Spite

To add to this, I've installed a few sets of H&R's and it's a pain in the A$$!!! I am yet to find a commercially available spring compressor, that you can rent, that will allow you to fit the springs to the control arm with the tool attached.
What I do is compress the spring, the twin external compressor is good for this, and either wire tie or use zip ties (the heavy duty ones and lots of them!!!!), slowly release the compressor to ensure it will remain compressed, install, raise jack and carefully cut the ties. Then re-install everything else.
This method has worked for me on various Foxes over the years. Again, as stressed, be VERY careful. The springs have a lot of energy when compressed!!!!
Have you ever used the little tool from MM to put these in?Originally Posted by Chalky

86 1D #9823
H&R Sport Springs, T-Coupe Intercooler, CAI, Bosch Bypass, 3" DP

Also remember that the springs could have a top and bottom. They also need to be installed registered in the spring cup correctly.
I am currently in the process of finishing the install of my H&R Sports. I followed MFE's method on corral.net basically you leave the strut and spindle attached and remove the inner 'A' arm bolts and lower the control arm from the K-member. This way (in theory) if the spring pops out it will hit the K-member or strut and not come flying out at you. For the install I used the more traditional method of installing the springs and used MM's tool. I would highly recommend MM's tool, it made it a heck of a lot easier to get the spring in, and also helps lower the possibility of the spring popping out unexpectedly. In fact I do not think I would do another install without this tool. With the above method of removing the springs, and with MM's tool to install, I was able to remove and install the springs without the use of a spring compressor. As others have mentioned, safety is your biggest concern, this is very DANGEROUS! Be sure to secure the springs with tie downs or chains, and do not stand directly in the path of the spring.
Wow!! Just checked that out on MM's page, pretty neat!! Did you use that on a stock SVO control arm??
VERY interesting, as often as I fiddle with these things I'll have to give that technique a try.
Enough of that, it was giving me a headache.
I haven't done it yet but I did spend the $20 on the little tool. I know a couple of SVO guys over at FEP have used it with great success and say it is will worth the $$ for the ease of installation.
Putting new springs in is not really my concern but getting the old ones out is. But... sounds like it shouldnt be all that hard or dangerous even without a compressor as long as you take a few precautions and take your time lowering the control arm.
86 1D #9823
H&R Sport Springs, T-Coupe Intercooler, CAI, Bosch Bypass, 3" DP
Brian, are you going to use rubber or poly spring insulators?? I'd be interested to see pics and measurement (fender lip to ground) before and after to se how much they drop your car.
As far as isolators go, if they're the originals, replace them.

Seen a youtube vid of a guy using that tool. Very nice!! Worth the $20 for sure!
Officially "banned for life" from SVOCA!!

Here's my contribution. When I installed Eibachs on Thunderstang, I took some pics and wrote a small article. The key is patience and an inside spring compressor..............................
Mustang coil spring install
If you mean this video http://www.youtube.com/watch?v=stNSSOo8Gjs that is damn impressive!!! I would think this would only work if you engine was in right???
I have a new set of poly isolators to go in with the springs. I will take measurements and photos before and after. I expect to get about 1.5" maybe a bit less since using new poly isolators.
What kind of drop did you get with yours? Are you using isolators? If so which ones?
86 1D #9823
H&R Sport Springs, T-Coupe Intercooler, CAI, Bosch Bypass, 3" DP
I know there are isolators in the back, not sure about the front (maybe just the upper), but they are rubber.
Here's a before and after pic and not only illustrates the difference in ride height, but also what a POS my car used to be!!!!!
No, you can take a chain or a hold down, hook it to the k-member, loop it under the jack and tighten it up.
Enough of that, it was giving me a headache.
Your car looks way lower than other photos I have seen of SVOs with H&R Sports. I hope mine isn't that low. These are two photos of cars I know are running the same springs.
86 1D #9823
H&R Sport Springs, T-Coupe Intercooler, CAI, Bosch Bypass, 3" DP
Holy Crap, how did you get that red car to shine like that!!!
Enough of that, it was giving me a headache.
Water proof lipstick!
 Posting Permissions

 Reply With Quote